Tuesday, February 6, 2018

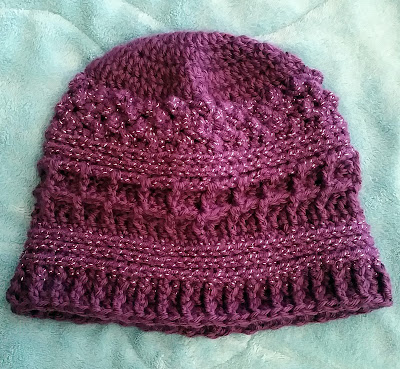
Waffle Berry Hat Crochet Pattern

Waffle Berry Hat
Intermediate level - but once you see how easy these stitches are, you will be surprised.
By Alison Hertz


For this hat, you will need 1 or 2 yarn colors. 
I used a J Hook (5.75) 
This hat is approximately 22 inches around and 8 to 9 inches long.

Stitch abbreviation's
ch chain stitch
ss slip stitch
hdc half double crochet
dc double crochet
fpdc front post double crochet

For the waffle stitch and the raspberry stitch, you can look up a tutorial on YouTube if my directions confuse you. I hope they don't. 

Color A
Row 1) 15 DC into a magic circle, ss to close (15)
Row 2) ch2, 2 dc into each stitch all the way around, ss to close (30)
Row 3) ch2, *2dc into first stitch, then 1dc into next*, repeat all the way around, ss to close (45)
Row 4) ch2, *2dc into first stitch, then 1dc into next 2 stitches*, repeat all the way around, ss to close (60)
Row 5) ch2, *2dc into first stitch, then 1dc into next 6 stitches,* repeat all the way around, ss to close (70) If using 2 colors, change to color B

Color B
Row 6) ch2 and turn your work so you are now working on the inside of the hat for the Raspberry Stitch, *sc dc sc in first stitch, then skip 2 stitches,* repeat all the way around and ss to close. (70)
Row 7) ch2 and continue working on the inside for another row of Raspberry Stitch. In the first space after the 1st raspberry from the previous row, *sc dc sc, then skip 2, so that you put the next berry in between 2 from the previous row. This offsets the berries.* repeat all the way around and ss to close. (70)
Row 8) repeat row 7
Row 9) repeat row 7
Row 10) ch2, and turn work so you are back to working on the outside of the hat, 1hdc in each stitch, ss to close (70)
Row 11) ch2, 1 third loop hdc in each stitch. This flips the stitch forward to look like a stripe. as to close (70)
Row 12) repeat row 11 (70) If using 2 colors, change back to color A.

Color A
Row 13) Waffle Stitch - ch2, *fpdc around first stitch, dc into next 2,* repeat all the way around and ss to close. (70)
Row 14) ch2 and turn work, *dc, fpdc into next 2 (these were the stitches you did a regular dc into in the previous row),* repeat all the way around and ss to close. (70)
You may need to keep checking to make sure your stitches are lining up. Stitches that were dc in the previous row are now fpdc in this row and stitches that were fpdc in the previous row are now dc in this row.
Row 15) ch2 and turn your work, *fpdc around first stitch, dc into next 2,* repeat all the way around and ss to close. (70)
Row 16) ch2 and turn work, *dc, fpdc into next 2 (these were the stitches you did a regular dc into in the previous row),* repeat all the way around and ss to close. (70)
You should now have 2 rows of finished waffles (created by 4 rows of stitches) If using 2 colors, change to color B.

Color B
Row 17) ch2, 1hdc in each stitch, ss to close (70)
Row 18) ch2, 1 third loop hdc in each stitch. ss to close (70)
Row 20) ch2, 1dc into the third loop of each stitch (70) If using 2 colors, change back to Color A.

Color A
Row 21) ch2, *1fpdc, 1dc,* repeat all the way around and as to close (70)
Row 22) repeat row 21
Row 23) repeat row 21
Finish off and sew in ends.


Post a pic if you try out the pattern. 

Stitches Close Up...
Sunday, January 7, 2018

V Stitch Beanie


This pattern is for an approximately 22 inch Medium hat that is 8 inches long.

Vocabulary
hdc - half double crochet
dc - double crochet
ch - chain
ss - slip stitch
fpdc - front double crochet

To create a V stitch. You crochet 2dc into the same spot in between the two dc from the previous row.
In my example, Color A is Berry, Color B is pink, Color C is white.

You need 2 or 3 colors. This pattern shows using 3 colors.

This hat is worked from the top down to the trim.

TOP-
Row 1 - Color A Make a magic circle, then 2 ch, then crochet 14 dc into the circle, change to color B before you Ss through the top of the 2 ch to close your row. (14)

Row 2 - ch 2 in Color B, then 2 dc in between each dc of row 1. Change to Color C and finish your row with a SS into the top of the ch from beginning this row. (28 stitches, 14Vs)

Row 3 - ch 2 in Color A, *2 dc in between your dh and the first V from the previous row, then 2 dc into the next 2 Vs*, repeat all the way around. Change to Color A and ss into top of ch from beginning this row. (42 stitches, 21Vs)

Row 4 - ch 2 in Color C, *2dc in between your ch and the first V from the previous row, then 2 dc into the next 3 Vs*, repeat all the way around. Change to Color B and ss into top of ch from beginning of this row. (56 stitches, 28Vs)

Row 5 - Note: You are only adding 4 Vs to this row so you have a total of 64 stitches. Ch 2 in color A, *2dc in between your ch and the first V from the previous row, then 2 dc into the next 7 Vs*, repeat all the way around. Change to Color C and ss into top of ch from beginning of this row. (64 stitches, 32Vs) - NOTE: If you want your had wider, add in increments of 2 dc (1 V stitch is 2 dc).


SIDES -
Row 6 - Ch 2 in Color B, 2dc into each V all the way around. Change to Color A and ss into top of Ch. (64 stitches, 32Vs)

Row 7 - Ch 2 in Color A, 2dc into each V all the way around. Change to Color B and Ss into top of Ch. (64 stitches, 32Vs)

Row 8 - ch 2 in Color C , 2dc into each V all the way around. Change to Color C and Ss into top of ch. (64 stitches, 32Vs)

Row 9 - ch 2 in Color A, 2dc into each V all the way around. Change to Color A and Ss into top of ch. (64 stitches, 32Vs)

Row 10 - ch 2 in Color B, 2dc into each V all the way around. Change to Color B and Ss into top of ch. (64 stitches, 32Vs)

Row 11 - ch 2 in Color A, 2dc into each V all the way around. Change to Color C and Ss into top of ch. (64 stitches, 32Vs)

Row 12 - ch 2 in Color C , 2dc into each V all the way around. Change to Color A and Ss into top of ch. (64 stitches, 32Vs)

Row 13 - ch 2 in Color A, 2 dc into each V all the way around. Change to Color B and ss into top of ch. (64 stitches, 32Vs)

Row 14 - ch 2 in Color B , 2dc into each V all the way around. Change to Color C and Ss into top of ch. (64 stitches, 32Vs)

Row 15 -  ch 2 in Color A, 2dc into each V all the way around. Change to Color A and Ss into top of ch. (64 stitches, 32Vs)


STITCH CHANGE
Row 16 - ch 1 in Color C (white), hdc into top of each stitch (not in between as you did for the Vs - just stitch these normally), then Change to Color A and ss into top of ch.

STITCH CHANGE
Row 17 - ch 2 in Color A, then 1 dc in each stitch. ss in top of ch.

STITCH CHANGE
ROW 18, 19, & 20 (you can always do more of this row) - In Color A, ch 2, *fpdc into first hdc from previous row, then dc into top of next stitch, repeat all the way around.

Finish off and tuck in your ends using a yarn needle.

Have fun!
-Alison Hertz